Mods are a great way to enhance your gaming experience in Cyberpunk 2077 on PC. However, getting into mods can be intimidating, as it does require a little computer know-how to get things set up. It doesn’t have to be scary, though, and we’re here to walk you through the entire process of how to install mods in Cyberpunk 2077.
Below, we’ll walk you through the four steps required to download and install your first Cyberpunk 2077 mod. After following the guide, you should be able to comfortably install new mods on your own.
Refer to our list of best Cyberpunk 2077 mods if you’re interested in checking out some of our favorite mods for the Edgerunners Update.
How to Install Mods in Cyberpunk 2077
To install mods in Cyberpunk 2077, you’ll need to download Cyberpunk 2077 REDmod, find and download mods, install them into your Cyberpunk 2077 directory, and enable them in-game.
To install mods in Cyberpunk 2077:
- Install Cyberpunk 2077 REDmod.
- Find and download Cyberpunk 2077 mods.
- Move the mod files into the Cyberpunk 2077 directory.
- Launch Cyberpunk 2077 and enable mods.
Step 1: Install Cyberpunk 2077 REDmod
The first step to modding Cyberpunk 2077 is installing REDmod, the official Cyberpunk 2077 modding tool.
To install Cyberpunk 2077 REDmod:
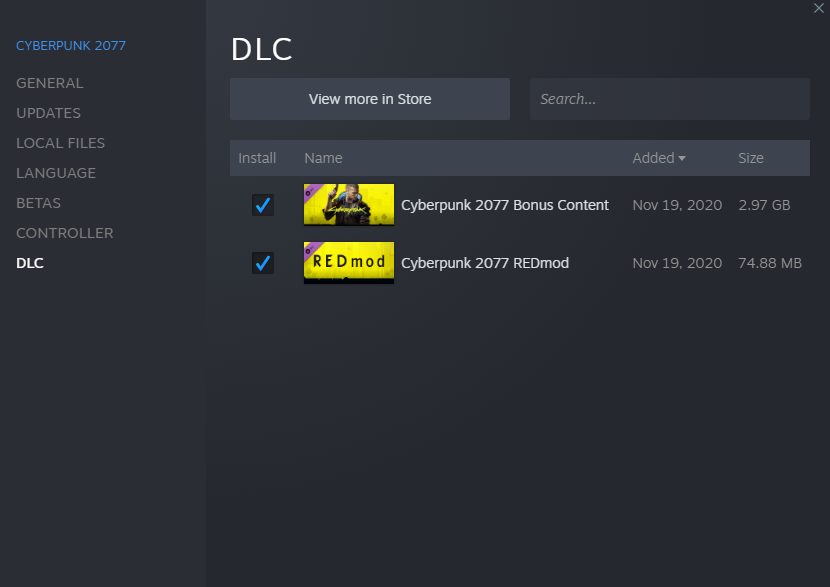
- Visit the Cyberpunk 2077 REDmod page on Steam and add it to your Library.
- Navigate to the Steam Library menu, right-click on Cyberpunk 2077, and go to Properties.
- Navigate to the DLC tab and ensure Cyberpunk 2077 REDmod is enabled.
REDmod is also available on GOG, and the installation process is similar to Steam.
Step 2: Create a mods folder in the Cyberpunk 2077 directory
After installing Cyberpunk 2077 REDmod, it’s time to set the file directory for mods. Mods go into a folder inside the Cyberpunk 2077 directory called “modded.”
- Open your Steam Library.
- Right-click Cyberpunk 2077, go to Manage, and Browse Local Files.
- Open the r6 folder, go into the cache folder, and create a new folder named modded.
D:\Steam\steamapps\common\Cyberpunk 2077\r6\cache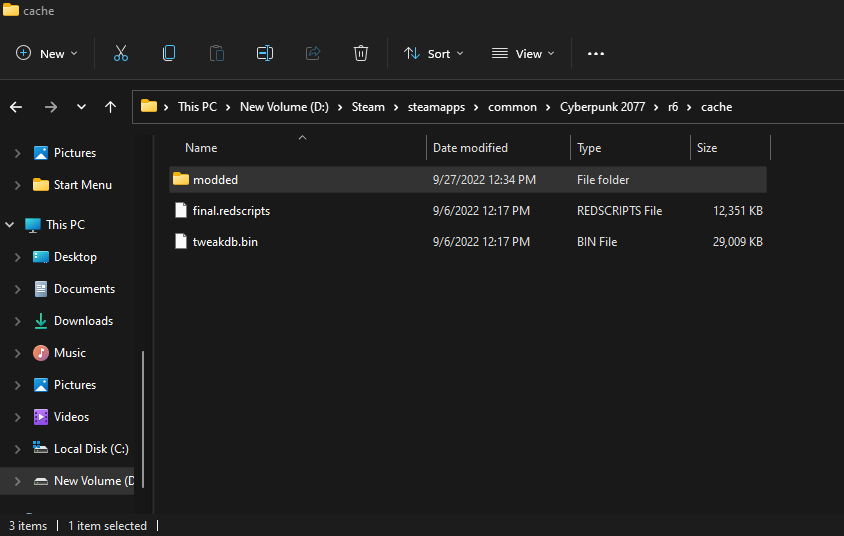
Step 3: Find and Download Cyberpunk 2077 Mods
With REDmods all set up and the modded directory created, it’s time to find and download Cyberpunk 2077 mods. The number one place to find mods for Cyberpunk 2077 is a website called Nexus Mods.
To find and download Cyberpunk 2077 mods:
- Visit the Cyberpunk 2077 Nexus.
- Find a mod you want to download and save it to your Desktop.
- Double-click on the .zip file to view the contents.
- Copy the files to the appropriate folders.
Some mods will contain an r6 and mods folder. You can drag these contents into the main Cyberpunk 2077 directory to ensure they go to the proper folders.
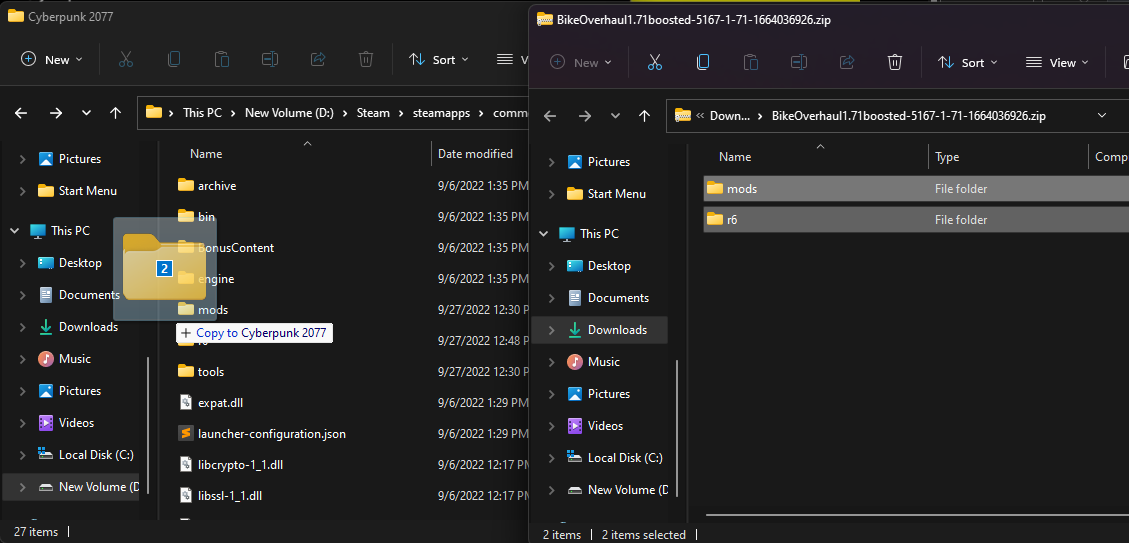
D:\Steam\steamapps\common\Cyberpunk 2077It’s common to find mods that do not have the typical file structure. You may download a mod that contains a folder that does not match any of the folders inside the Cyberpunk 2077 directory. In this case, you can move the folder into the Cyberpunk 2077\mods directory.
D:\Steam\steamapps\common\Cyberpunk 2077\modsStep 4: Launch Cyberpunk 2077 and Enable Mods
Next, you’ll need to launch Cyberpunk 2077 and enable mods from the game launcher. Launch Cyberpunk 2077 from your Steam Library, and on the Cyberpunk 2077 launcher, click on the gear icon to the right of the yellow Play button. Toggle the slider on to enable mods.

When you launch Cyberpunk 2077, you should see a message that says Initiating Mods. The message will only pop up once after you’ve installed a new mod. After that, the game should instantly launch without the deploying mods prompt.
If you do not see the gear icon, it means you have not yet installed a mod. Refer back to step 3 to download and install a mod successfully. Then, retry the steps above.
Each mod has its own instructions on the Nexus Mods website. Read through each mod’s description for instructions on how to use it. You can navigate to the posts tab on each mod in Nexus Mods to help troubleshoot any issues you’re having with a particular mod.
GOG users can go to the Cyberpunk 2077 game page, click on the settings button at the top right, go to Manage installation, and select Configure. Navigate to the Features tab, scroll down, and select the box to the right of Enable mods.
Installing Cyberpunk 2077 Mods Without REDmod
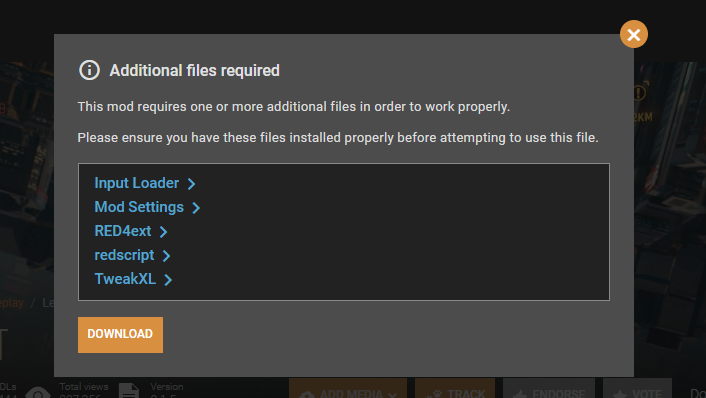
Some legacy Cyberpunk 2077 mods require additional files to function properly. When you download these mods from Nexus Mods, you’ll see a message saying Additional files required. You must download and install all the needed files before using the corresponding mod.
For example, the Let There Be Flight Mod requires Input Loader, Mod Settings, RED4ext, redscript, and TweakXL.
The process for installing these is similar and straightforward. Download the mods from Nexus Mods, and open the zip files. Find the corresponding folders in your Cyberpunk 2077 directory, and drag and drop the mod contents into the appropriate folders.
For example, you might download a mod containing a bin folder. Those files will need to go inside the
Drag the content into your base Cyberpunk 2077 directory to put the files in the appropriate directories.
That’s everything you need to know about how to download and install mods in Cyberpunk 2077. Feel free to comment below if you have any problems or want to start a discussion.
Visit our Cyberpunk 2077 Section for more guides and walkthroughs.